
Blender Fluid Simulation
This guide is an introduction to using the Blender 3D software to simulate fluids, in this case, water. This tutorial will present a simple scene in which we will add water, configure the simulation, and see the result. Note for  3ds Max users: If you want to do something similar to this in 3ds Max, take a look at the 3ds Max BlobMesh tutorial.
For this tutorial, you will need a recent release of Blender along with plenty of hard drive space and RAM. As you can imagine, simulating fluids means processing a lot of data. That data will be manipulated in RAM and permanently stored on your hard drive. Even compressed, complex simulations can require a few gibibytes.
First of all, I have a simple scene already made. It simply consists of a flight of stairs, down which water will pour. You can download this stair scene (stairway_tut.blend, v. 2.45) to save you the time of remaking it, since I assume you already have a good grasp of basic Blender functions.
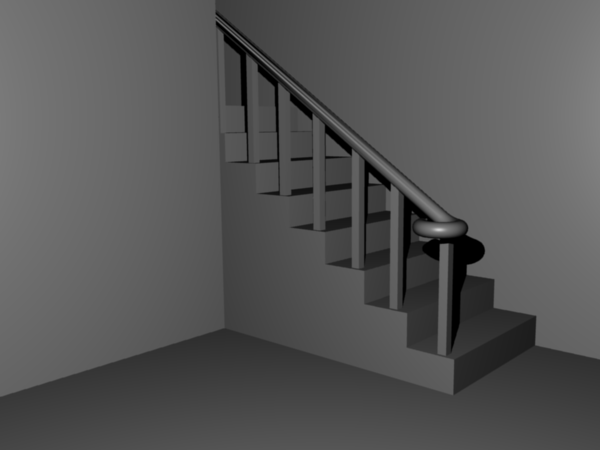
There are three geometry objects in the scene: the main structure (including stairs), the railposts, and the railing. From here, we can move straight to setting up the simulation.
At the very minimum, a simulation needs two things: a domain and a source of fluid. The domain is a cuboid that defines the limits of the simulation. Fluid cannot leave the domain; the domain will act as an invisible wall for the fluid. Second, you need a source of fluid. You can either create a volume
or inflow,
which will be explained shortly.
First, create the domain by creating a cube and then scaling it. We want the domain to be just small enough to contain only what is necessary, but not smaller than the walls. In the screenshot below, the larger cuboid is my domain, and its edges lie inside the walls.

Now, we need to create the water source. Create another cuboid (although this time it doesn't have to be a cuboid) at the top of the stairs. It's shown as the smaller pink cuboid in the above screenshot.
Now, it's time to apply the simulation properties. You will find these properties in the physics panel.

Select the water source, the small cuboid, and enable it for simulation with the Enable
button. Set it to inflow. The difference between inflow and volume, is that volume defines a fixed amount of water. A volume of water can move around and everything, but whatever it starts with is how much you will have. An inflow, on the other hand, is a neverending source of fluid. It will begin with that volume of fluid, but will keep pumping out more.
In the inflow's options, you will see Inflow velocity.
Since we want the water to flow towards the stairs, the X direction, set X to something above one. I set mine to something around 4.
The water needs to flow around the walls and down the stairs, so those will have to be included in the simulation as well. Select the stairs, enable it for fluid simulation, and set it to be an obstacle. Also, you will have to set Init Shell
because the obstacles are defined by the outer surface. In other words, the water is outside the object and stays out.

Select the large cuboid and enable it for fluid simulation. Choose Domain
. Now, you'll see several other properties appear. These properties control the overall simulation, and are only accessible when you have the domain object selected. These settings are the most important for the simulation.
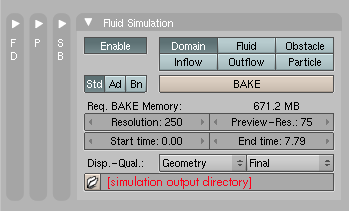
In the standard options (labelled Std
), set the end time to at least 5. A simulation's length is defined by two important numbers. The animation end frame count, in the animation panel, determines how many frames the simulation lasts and how many frames to write data for. The fluid simulation end time controls how long the fluid would have flowed in real life. Here, my settings define my simulation to be 7.8 seconds spread over the default 250 frames. If you set the fluid simulation start time to a higher number, that will control how long the fluid has been flowing before it is seen.
The resolution controls how detailed the simulation is. High resolution can take a lot of memory, as shown by Req. BAKE Memory.
Never set it to more than the amount of RAM you have on your computer. If Blender crashes when you try to bake the simulation, try lowering the resolution. Also, while you're here, don't forget to set the output directory to the same folder you saved this file. Don't save things in /tmp/.
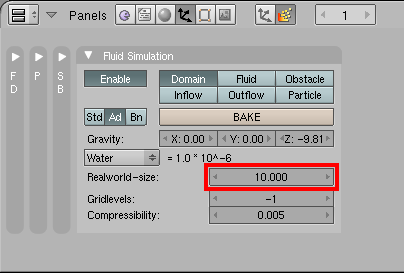
Next, check out the advanced settings (labelled Ad
). These setting specify real-world attributes, and will be more familiar if you have some knowledge of physics. Gravity is defined in meters per second, and the realworld-size is defined in meters. I set it to the maximum value, 10. A realworld-size of 0.03 will give you vastly different results from a realworld-size of 3.0.
Now that everything is set up, you're ready to bake the simulation. Fluid simulation isn't in realtime, so baking the simulation precalculates the fluid movement and then saves the results in the output directory you set earlier. Baking takes a long time, and even worse, it's not currently multithreaded in Blender. If you don't want to wait so long, you can either set a lower animation end frame in the animation options so less frames are calculated, or lower the resolution of the simulation.
As the progress bar scrolls across, you will begin to see the results. By default, your screen only shows the low-quality preview mesh—the high-quality one will be visible when you render—but you can change that in the standard domain settings.
For a high-quality version of the flash video at the beginning, download stairway.avi (h.264 AVI 1.82 MiB).
If you want to try a slightly different water simulation, see if you can reproduce the following video:
blog comments powered by Disqus